Date:
May 10, 21
The great thing about Decsys is its unique image processing technology called multiple imagers.
For example, in the case of a cylindrical shaft product manufactured at our mass production factory Fortune Cross.
Rotate the work once and capture the scanned image starting from multiple lines that are easy to catch scratches.
It detects small scratches, dents, and other matter.

It may be easier to imagine a scan copy of the documents you usually use at work.
For scan copy, a row of scan cameras moves in the direction of paper travel.
By scanning the manuscript at a time, one image can be created.
The great thing about Decsys is that you can set it to read multiple images at a time instead of just one.
(Up to 8 images can be set).
For example, if you rotate a cylindrical metal product (a golf club shaft is fine)
1. Areas where light is strongly reflected (scratches that are easy to see in bright places such as dirt and rust)
2. Relatively dark areas (scratches, dents, and other scratches that are easily visible in dark places)
3. The part where light is reflected in the middle (scratch etc. that is easy to see in the middle)
You can see that there is.
If you scan from these three types of lines with different light reflections as the starting point,
You can capture three images in different modes.
By analyzing these multiple images with our own algorithm and image processing technology,
Small scratches, dents, foreign matter, dirt, rust, etc. can be detected at once.
Even when a person inspects, he unconsciously changes the direction and angle of the work to see the scratches.
With equipment that incorporates movements and elements that are exactly like those inspected by humans
It detects defects with detection accuracy equal to or higher than that of humans.
Judgments are divided by workers, and quality variations are likely to occur.
Once a quality problem occurs, I feel that the inspection standards have suddenly become stricter.
The site is also afraid of complaints and over-detection, the non-defective rate drops, leading to a loop of productivity deterioration.
In this respect, the boundary between OK and NG can be determined by the threshold value without feeling or Profit and loss.
It is externally strong to be able to numerically judge the part that relied on the feeling of a skilled visual inspector.
Eliminating human error and making inspection accuracy uniform is one of the greatest merits of automation.
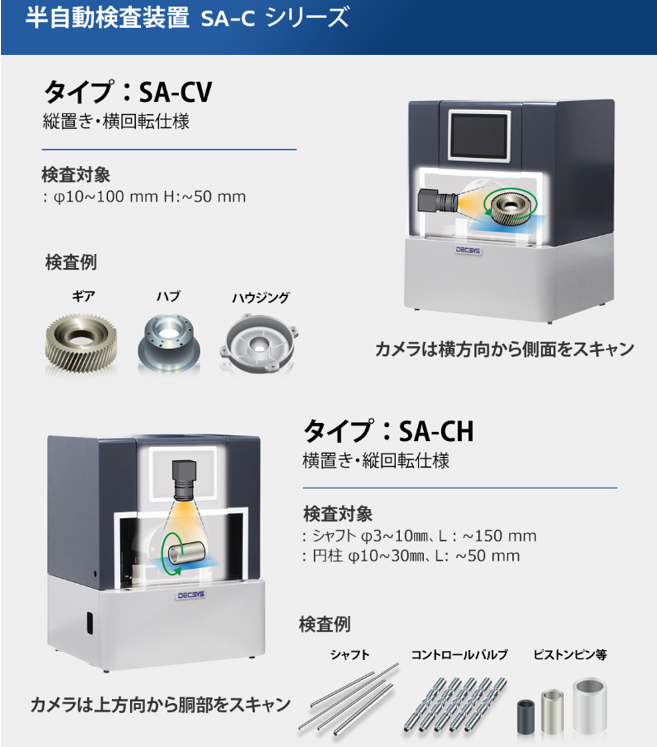
[Overview of SA-C series]
Inspection capacity: 1 sec to 4 sec / per piece (including rotation and processing time)
Detection ability: scratches, dents, foreign matter 0.15 mm ~
Type: Semi-automatic machine (manual loading / unloading, automatic judgment)
Above all, this SAC series is semi-automatic, so it is attractive at low cost!
So
How about reducing the burden on inspectors and promoting labor saving at your company?
First of all, it is possible to have a meeting from the sample test evaluation
If you have any problems with the visual inspection, please feel free to contact us!
Then, let's make this week a wonderful week ♪
For inquiries, please contact here ↓
*━*━*━*━*━*━*━*━*━*━*━*━*━*━*━*━*━*━*━*━*
Company name: Nano Seimitsu Co., Ltd
Address: 162 Moo 17 Bangplee Industrial Estate Sio3, Debaratana Rd.,
Bangsaothong, Samutprakarn 10570 Thailand
Yada Mobile: +66 (0) 61-572-1700 (Japanese direct)
Email: yada@fortune-cross.com
*━*━*━*━*━*━*━*━*━*━*━*━*━*━*━*━*━*━*━*━*
For example, in the case of a cylindrical shaft product manufactured at our mass production factory Fortune Cross.
Rotate the work once and capture the scanned image starting from multiple lines that are easy to catch scratches.
It detects small scratches, dents, and other matter.

It may be easier to imagine a scan copy of the documents you usually use at work.
For scan copy, a row of scan cameras moves in the direction of paper travel.
By scanning the manuscript at a time, one image can be created.
The great thing about Decsys is that you can set it to read multiple images at a time instead of just one.
(Up to 8 images can be set).
For example, if you rotate a cylindrical metal product (a golf club shaft is fine)
1. Areas where light is strongly reflected (scratches that are easy to see in bright places such as dirt and rust)
2. Relatively dark areas (scratches, dents, and other scratches that are easily visible in dark places)
3. The part where light is reflected in the middle (scratch etc. that is easy to see in the middle)
You can see that there is.
If you scan from these three types of lines with different light reflections as the starting point,
You can capture three images in different modes.
By analyzing these multiple images with our own algorithm and image processing technology,
Small scratches, dents, foreign matter, dirt, rust, etc. can be detected at once.
Even when a person inspects, he unconsciously changes the direction and angle of the work to see the scratches.
With equipment that incorporates movements and elements that are exactly like those inspected by humans
It detects defects with detection accuracy equal to or higher than that of humans.
Manual inspection is excellent in mobility and flexibility, but on the other handBenefits other than labor saving
Judgments are divided by workers, and quality variations are likely to occur.
Once a quality problem occurs, I feel that the inspection standards have suddenly become stricter.
The site is also afraid of complaints and over-detection, the non-defective rate drops, leading to a loop of productivity deterioration.
In this respect, the boundary between OK and NG can be determined by the threshold value without feeling or Profit and loss.
It is externally strong to be able to numerically judge the part that relied on the feeling of a skilled visual inspector.
Eliminating human error and making inspection accuracy uniform is one of the greatest merits of automation.
[Overview of SA-C series]
Inspection capacity: 1 sec to 4 sec / per piece (including rotation and processing time)
Detection ability: scratches, dents, foreign matter 0.15 mm ~
Type: Semi-automatic machine (manual loading / unloading, automatic judgment)
Above all, this SAC series is semi-automatic, so it is attractive at low cost!
So
How about reducing the burden on inspectors and promoting labor saving at your company?
First of all, it is possible to have a meeting from the sample test evaluation
If you have any problems with the visual inspection, please feel free to contact us!
Then, let's make this week a wonderful week ♪
For inquiries, please contact here ↓
*━*━*━*━*━*━*━*━*━*━*━*━*━*━*━*━*━*━*━*━*
Company name: Nano Seimitsu Co., Ltd
Address: 162 Moo 17 Bangplee Industrial Estate Sio3, Debaratana Rd.,
Bangsaothong, Samutprakarn 10570 Thailand
Yada Mobile: +66 (0) 61-572-1700 (Japanese direct)
Email: yada@fortune-cross.com
*━*━*━*━*━*━*━*━*━*━*━*━*━*━*━*━*━*━*━*━*


